Tutorial 1 - 金钥匙
在 Tutorial 0 - 让它跑起来 中我们创建了一个获取 todos 数据只读的 API。使用单个端点列出 todos。 我们有很多办法可以使这个 API 更有趣,但一个好的开始是允许一些用户更改数据,而不仅仅是查询。
Step 1. 添加一个受信的用户
上一节中,进行匿名 Web 请求的事后在数据库中创建了一个 web_anon 角色。让我们在创建一个角色叫做 todo_user 用于使用 API 进行身份验证的用户,这个角色将有权对 todo list 做任何事情。
-- run this in psql using the database created
-- in the previous tutorial

create role todo_user nologin;
grant todo_user to postgres;

grant usage on schema api to todo_user;
grant all on api.todos to todo_user;
grant usage, select on sequence api.todos_id_seq to todo_user;
Step 2. 生成一个密码
客户端通过 API 使用 JSON Web Token 进行身份验证。JTW 是使用仅有我们和服务器知道的密码进行加密签名的 JSON 对象。 由于客户端不知道密码,所以不能篡改 token 的内容。 PostgREST 会检测伪造的 token 并拒绝它们。
我们来创建一个密码并提供给 PostgREST。最好想想一个复杂的长一点的,或使用一个工具来生成它。
打开 tutorial.conf (在上一节中创建的) 并将密码添加在新的一行:
# add this line to tutorial.conf

jwt-secret = "<the password you created>"
如果 PostgREST server 仍旧在运行中,那么需要重启它以便加载最新的配置文件。
Step 3. 生成 token
通常你自己的代码在数据库或其他服务器中将创建并签署身份验证 token,但是在本教程中,我们将“自己动手”。跳转到 jwt.io,并填写如下字段:
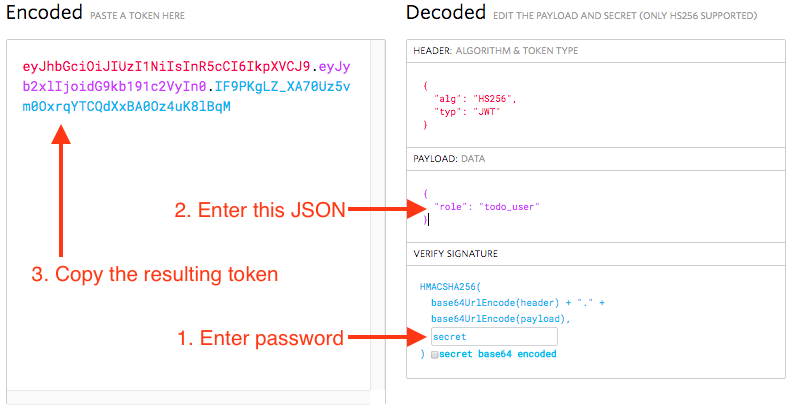
如何在 https://jwt.io 创建 Token
请记住您填写的密码,而不是图片里的 secret。填写密码和 payload 之后,左侧的编码数据会刷新,该数据即 token 复制它。
注解
虽然令牌可能看起来很模糊,但很容易逆向出的 payload。token 仅仅是被签名,没有加密,所以如果你有不想让客户端看到的信息请不要放在里面。
Step 4. 进行请求
回到 terminal,我们来用 curl 添加一个 todo。该请求将包括一个包含身份验证 token 的 HTTP 头。
export TOKEN="<paste token here>"

curl http://localhost:3000/todos -X POST \
     -H "Authorization: Bearer $TOKEN"   \
     -H "Content-Type: application/json" \
     -d '{"task": "learn how to auth"}'
现在我们已经完成了我们的 todo list 中的所有三个项目,所以我们通过 PATCH 请求将他们全设置为 done。
curl http://localhost:3000/todos -X PATCH \
     -H "Authorization: Bearer $TOKEN"    \
     -H "Content-Type: application/json"  \
     -d '{"done": true}'
请求一下 todo 看看这三项,全部都已完成了.
curl http://localhost:3000/todos
[
  {
    "id": 1,
    "done": true,
    "task": "finish tutorial 0",
    "due": null
  },
  {
    "id": 2,
    "done": true,
    "task": "pat self on back",
    "due": null
  },
  {
    "id": 3,
    "done": true,
    "task": "learn how to auth",
    "due": null
  }
]
Step 4. 添加过期时间
目前,我们的认证 token 对于所有请求都是一致有效的。服务器只要继续使用相同的 JWT 密码,就会通过验证。
更好的策略是让 token 使用 exp 声明一个过期时间戳。这是 PostgREST 特别对待的两个 JWT 声明之一。
| Claim | Interpretation |
|---|---|
role |
The database role under which to execute SQL for API request |
exp |
Expiration timestamp for token, expressed in "Unix epoch time" |
注解
Unix 时间戳 (Unix epoch time) 被定义为自 1970 年 1 月 1 日 00:00:00 协调世界时(UTC)以来到现在的总秒数,不考虑闰秒。
为了在行动中观察过期,我们将添加一个在 5min 之后过期的 exp 声明。首先找到从当前时间算起到 5min 之后的时间戳。 在 psql 中运行:
select extract(epoch from now() + '5 minutes'::interval) :: integer;
回到 jwt.io 并修改 payload
{
  "role": "todo_user",
  "exp": "<computed epoch value>"
}
拷贝新的 token,然后将其保存为一个新的环境变量。
export NEW_TOKEN="<paste new token>"
尝试在过期时间的前后使用 curl 进行该请求:
curl http://localhost:3000/todos \
     -H "Authorization: Bearer $NEW_TOKEN"
过期以后, 该 API 会返回一个 HTTP 401 Unauthorized:
{"message":"JWT expired"}
附加题: 立即撤销
Even with token expiration there are times when you may want to immediately revoke access for a specific token. For instance, suppose you learn that a disgruntled employee is up to no good and his token is still valid.
To revoke a specific token we need a way to tell it apart from others. Let's add a custom email claim that matches the email of the client issued the token.
Go ahead and make a new token with the payload
{
  "role": "todo_user",
  "email": "disgruntled@mycompany.com"
}
Save it to an environment variable:
export WAYWARD_TOKEN="<paste new token>"
PostgREST allows us to specify a stored procedure to run during attempted authentication. The function can do whatever it likes, including raising an exception to terminate the request.
First make a new schema and add the function:
create schema auth;
grant usage on schema auth to web_anon, todo_user;

create or replace function auth.check_token() returns void
  language plpgsql
  as $$
begin
  if current_setting('request.jwt.claim.email', true) =
     'disgruntled@mycompany.com' then
    raise insufficient_privilege
      using hint = 'Nope, we are on to you';
  end if;
end
$$;
Next update tutorial.conf and specify the new function:
# add this line to tutorial.conf

pre-request = "auth.check_token"
Restart PostgREST for the change to take effect. Next try making a request with our original token and then with the revoked one.
# this request still works

curl http://localhost:3000/todos \
     -H "Authorization: Bearer $TOKEN"

# this one is rejected

curl http://localhost:3000/todos \
     -H "Authorization: Bearer $WAYWARD_TOKEN"
The server responds with 403 Forbidden:
{
  "hint": "Nope, we are on to you",
  "details": null,
  "code": "42501",
  "message": "insufficient_privilege"
}